Sunday, 28 March 2010

Fresh from the oven - March 2010 - Kringel

This month's Fresh from the oven Challenge was hosted by Jo from Jo's Kitchen. She chose Kringel (an Estonian sweet or savoury bread) that has recently been featured in the Hairy Biker's programme, Mum's Know Best. Thank you Jo for hosting this months challenge.
It's been a while since I updated the blog and even longer since I took part in a challenge so hopefully this challenge will see me back to regular blogging and taking part in challenges. I ended up baking this bread today! as it was the only totally free day I have had at home in ages. I also baked a wholemeal loaf for this weeks lunch. It has been so long since I baked I had to get my bread book out to check on all the quantities which I used to know by heart!

Since there is only the two of us to eat this sweet bread I halved the recipe and we also decided to make it a little healthier and omit the chocolate topping (partly as we had none in the house). The recipe was simple and relatively quick and the end result was like nothing I have baked before. I do think that the chocolate topping would have improved it. I used dried yeast and just halved the quantity. There were also a few comments from members that 1tsp salt was missing from the recipe and the original recipe stated 'flour' and we decided it meant white bread flour. I have added these additions to the recipe below but have heard the some members struggled with this recipe as they stuck to the original recipe which perhaps has a few flaws. I couldn't make my mind up from the recipe instructions for platting the dough in which direction to cut the dough in half. I went for length wise which made the platting easier but the bread didn't turn out like the picture!

Kringel
(adapted from The Hairy Bikers, mums know best)

Ingredients (Makes 1 Loaf)


Dough

  • 40g fresh yeast
  • 1tbsp sugar
  • 250ml milk, lukewarm
  • 2 egg yolks
  • 50g butter, melted
  • 1tsp salt
  • 600-700g white bread flour

Filing

  • 100g butter, softened
  • 3 handfuls of raisins
  • 10 tsp sugar

Topping

  • 150g dark chocolate (at least 50% cocoa solids)
  • 75g butter

Method

Mix the yeast and sugar in a bowl. Add the lukewarm milk and egg yolks, then mix in the flour, salt and melted butter and knead well. Shape the dough into a ball, cover the bowl with a tea towel and leave to rise in a warm place for 30 minutes.

Preheat oven to 200°c/Gas 6. Dust your work surface with flour. Take the dough out of the bow, knock it back and roll out to a thickness of 1cm. Spread the softened butter evenly over the rolled sheet of pastry, then sprinkle with raisins and finally sugar.

Roll up the dough like a swiss roll and cut it in half with a sharp knife. Starting from the uncut end, plait the dough, lifting each half over the other in turn. Finally, shape the plaited bread into a B shape and transfer to a buttered baking tray. Bake for about 25 minutes or until golden.

In the meantime, prepare the chocolate topping by melting the chocolate and butter in a bowl over boiling water. Once out of the oven, let the bread cool down a bit, place on a serving plate and drizzle with chocolate sauce.

Stumble Upon Toolbar

Monday, 8 March 2010

Lancashire hotpot recipe

I've been full of cold and generally feeling under the weather for the past week or so (hence the lack of posts on either of my blogs). I haven't felt up to cooking much but once I started to feel better this weekend I have been planning what to cook and craving good homely comfort food. This dish fitted the bill perfectly. Lancashire hotpot is a traditional British dish which is essentially a lamb stew topped with sliced potatoes on top. Its simple to prepare and the flavours are delicious. But not the easiest dish to make look pretty!
Lancashire hotpot

Serves 4
1-2tbsp olive oil
500g Lamb neck fillet, diced
4 medium carrots, peeled and cut into 1cm thick discs
1 onion, diced
1tbsp plain flour
250ml lamb stock
1tbsp Worcestershire sauce
1tbsp dried thyme (or a couple of sprigs of fresh thyme)
2 bay leaves
4 baking potatoes, peeled and cut into thin slices
few small cubes of butter (optional)

Preheat the oven to 170C
Heat the olive oil in a cast iron casserole dish over a medium heat. Add the lamb and carrots. Stir occasionally until the meat has browned and the carrots softened slightly. Set aside on a plate.
Sweat the onion in the meat juices (add more oil if necessary) for a couple of minutes.
Add the flour and stir well.
Add the stock, Worcestershire sauce, thyme and bay leaves and stir until the flour mixes into the gravy.
Make a layer of potatoes under the gravy (place in the gravy and use your wooden spoon to push them under the surface. Add the meat and carrots back to the gravy.
Arrange the remaining potatoes over the top. Add some small butter cubes around the top.
Put the lid on and cook in the oven for 1 hour with the lid on and 20-30 minutes at the end without the lid until the potatoes are golden.

Stumble Upon Toolbar

Wednesday, 24 February 2010

Tomato, sausage and fennel seed ragu with gnocchi

Recently my thoughts have been turning even more than usual towards Italy, Tuscany in particular (see here if you haven't heard why). The recipe below uses a typical combination of fennel seeds and pork. The recipe is simple to prepare and delicious to eat. It is from a great book I got for Christmas, The Italian cookery course. This book is fast becoming one of my favorite cookbooks. So far I have cooked a winter minestrone soup from it (which was the best I've tasted) and this delicious tomato, sausage and fennel seed ragu with gnocchi. I can't wait to find more time to cook more of the recipes. I also look forward to finding time to read this book cover to cover. The book includes lots of information on the ingredients used and traditional cooking in Italy and all it diverse regions. There are also lots of useful masterclasses on everything from breads, fresh pasta and risotto to stuffing a leg of lamb and how to bone a chicken or rabbit. To anyone who loves Italian food as much as I do this is 500 pages of wonderful writing, stunning photos of Italy and the food, lots of masterclasses and helpful techniques, not to mention several hundred delicious recipes. I am especially looking forward to spending some time trying out the bread recipes and masterclasses and also fresh pasta.

Back to the sausage ragu. I love the combination of fennel seeds and pork and this ragu works well with gnocchi as suggested in the book but I believe it would work equally as well with a pasta such as penne. I have only recently discovered gnocchi, its a nice change to pasta and very simple to cook (I love the way it floats to the top of the pan when it is ready). I really must find time to have a go at making my own gnocchi sometime soon. This recipe serves 6-8 and freezes well.

Tomato, sausage and fennel seed ragu with gnocchi

Serves 6-8

12 lean best-quality pork sausages
olive oil
4 whole garlic cloves, lightly crushed
salt and freshly ground black pepper
2 tablespoons fennel seeds
4 bay leaves
250ml red wine
800g Italian tinned plum tomatoes
6 heaped teaspoons tomato puree
grated Parmesan to serve
Packed of gnocchi to serve 6-8

Remove the sausage meat from the skins and chop up the meat to break it up.
Put the olive oil in a large frying pan (I used a cast iron casserole pot) over a medium heat and add the garlic, salt and pepper. Fry for about 2 minutes until the garlic becomes light gold.
Add the onion and fry for a few minutes, until translucent.
Stir in the fennel seeds and bay leaves.
Add the meat and fry for 6-7 minutes or until cooked through. Use a wood spoon to break up the mince and stop it sticking to the pan.
Add the wine and allow to reduce for a couple of minutes, then add the tinned tomatoes and tomato puree and stir well.
Leave the ragu to simmer for 10 minutes.
Cook the ragu according to the packet instructions.
Once cooked, drain the gnocchi and toss in the ragu.
Serve with Parmesan scattered over the top.

Stumble Upon Toolbar

Tuesday, 23 February 2010

cookbook review: New urban Farmer, Celia Brooks Brown

First impressions of this part gardening, part cook book were very positive. The book is full of stunning, brightly coloured photographs of Celia's allotment, vegetables and recipes.

The book is divided in to the four seasons and takes you through the full gardening year providing advice on what jobs need doing when, which vegetables to plant and suggesting recipes to cook with the crops in season each month.

Celia has her own allotment in London and this book is about a year on that plot and what she has learnt. I only have a very small area for planting, a small raised bed and room for a few containers but the book offers advice and encouragement for growing your own in your garden and in containers as well as on allotments. For each month there is a useful 2 page table of all the veg you can harvest and sow that month. It includes information on which ones are suitable for containers and points you in the direction of recipes in the book using each vegetable.

The recipes are simple and the photo's make your mouth water just looking at them. I particularly like the look of warm courgette salad with parmesan crackling, allotment bbq platter with two sauces and the chocolate upright pear cake.

I for one can not wait until March (where the book starts the new gardening year) to get started on my own small veg plot. I can see this book being a well used book in both the garden and the kitchen.

Thanks to Quadrille publishing for sending me this book to review.
paperback, £14.99
ISBN: 978-1-84400817-9

Stumble Upon Toolbar

Wednesday, 17 February 2010

Lake district foodie finds and wedding planning

Last week we went to Keswick for a couple of nights during which my boyfriend proposed. I have set up a separate wedding planning blog, somewhere I can bookmark and save ideas and inspiration for the big day. You can read all about the proposal here.

We are currently looking in to getting married in Tuscany, Italy. We do not know anyone else that has done this so if any of you do and you have any advice to share with us please contact me, I would love to hear from you.

Anyway back to foodie talk! I wanted to share with you a few foodie finds in Keswick. First up there was the B&B we stayed in - Howe Keld. It has won awards for it's breakfasts and it wasn't hard to see why. Check out the menu here. There was fresh smoothies every day, a great selection of cereal, yogurts, fruit (fresh and dried), nuts and seeds to start. Then wholemeal bread, banana bread or malt loaf (all home made). Cooked breakfast choices included a locally sourced full English (with a vegetarian option), smoked salmon and scrambled eggs or pancakes with maple syrup. The rooms are also very well decorated/designed and the staff friendly and helpful.

Next up was a little cafe/deli called good taste cafe. This cafe is run by a chef and the food is excellent. There are daily specials as well as a regular menu. I can highly recommend the pork and fennel seed meatball with mozzarella panini. On Saturdays the shop window is full of home baked breads which all look fantastic. Upstairs in the seating area there is a warming wood burning stove tables and chairs, comfy sofa's and books shelves stuffed full of cookbooks! They also run a selection of cookery classes which are listed on their website with everything from bread making to butchery (and a Tuscan inspired Italian class that sounds right up my street).

Finally I want to share with you a great restaurant in Keswick called Morrels. I had the Chorizo, Smoked Bacon, Peppered Salami & Tomato Risotto to start followed by Rump of Lamb with Minted Lamb Sausages, Boulangere Potatoes, Redcurrant & Thyme Jus. Finished off with a bramble, apple and flaked almond clafoutif. The lamb was perfectly cooked and all the dishes were delicious and flavoursome.

Stumble Upon Toolbar

Sunday, 14 February 2010

Daring cooks February 2010 - Mezze!

I was quiet excited by this months Daring cooks challenge chosen by Michele from Veggie Num Nums. The challenge was to prepare a mezze table. The compulsory element was to make homemade pita breads and hummus. The rest of the mezze was left completely open to us to get creative.

I've not cooked very much Middle Eastern food as yet but hummus and baked falafels have been things I have thought about attempting. Only a few days before the challenge I talked about making preserved lemons after reading an article about them. Obviously homemade bread is a regular feature in my house but I had not made my own pittas but again it was on my never ending list of recipes to try.

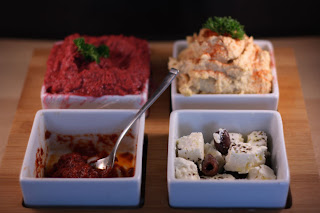
Middle Eastern flavours include olives, lemons, feta cheese, cumin, chickpeas, yogurt, beetroot, garlic, aubergines, tahini, paprika, lentils and mint. After a bit of research (and a very well timed mezze section on Market Kitchen) I decided to make a beetroot dip, baked falafels, feta cheese, olives and kebabs to go with the pita breads and hummus.

The pita breads were easier to make than I imagined and puffed up beautifully. They tasted delicious too. They were slightly thicker than shop bought ones which I found worked well. The hummus was also simple to make. You can find the recipes for these compulsory elements at the end of the post.First up these baked sweet potato falafels from Allegra McEverdy seemed the perfect choice for me. Falafels are usually deep fried but since I mostly try to cook healthier options, baked was the perfect solution. Sweet potatoes are also one of the most nutritious vegetables around. They are a great source of vitamins A, B6 and C, fibre, magnesium, copper, potassium and iron. The recipe can be found here on 101 cookbooks a fantastic healthy eating blog (most recipes based on natural, whole foods and ingredients) I have only recently discovered. The resulting falafels have great flavours and are delicious hot or cold, dipped in hummus or in a pita sandwich.

The kebab recipe comes from here another new find for me. This blog is full of straight forward recipes for Mediterranean food that all look delicious. The kebabs were delicious in the pita breads with some of the tomato paste from the same recipe and much healthier than the take away versions!The beetroot dip recipe was one I saw on Market Kitchen and can be found on there website here. The flavours worked well together and I preferred this to the hummus for dipping pita bread in. Finally I marinaded some cubes of feta cheese and some black olives in some extra virgin olive oil and dried oregano.
Pita Bread – Recipe adapted from Flatbreads & Flavors by Jeffrey Alford and Naomi Duguid
Prep time: 20 minutes to make, 90 minutes to rise and about 45 minutes to cook

2 teaspoons regular dry yeast (.43 ounces/12.1 grams)
2.5 cups lukewarm water (21 ounces/591 grams)
5-6 cups all-purpose flour (may use a combination of 50% whole wheat and 50% all-purpose, or a combination of alternative flours for gluten free pita) (17.5 -21 ounces/497-596 grams)
1 tablespoon table salt (.50 ounces/15 grams)
2 tablespoons olive oil (.95 ounces/29 ml)

Directions:
1. In a large bread bowl, sprinkle the yeast over the warm water. Stir to dissolve. Stir in 3 cups flour, a cup at a time, and then stir 100 times, about 1 minute, in the same direction to activate the gluten. Let this sponge rest for at least 10 minutes, or as long as 2 hours.
2. Sprinkle the salt over the sponge and stir in the olive oil. Mix well. Add more flour, a cup at a time, until the dough is too stiff to stir. Turn it out onto a lightly floured surface and knead for 8 to 10 minutes, until smooth and elastic. Rinse out the bowl, dry, and lightly oil. Return the dough to the bowl and cover with plastic wrap. Let rise until at least doubled in size, approximately 1 1/2 hours.
3. Place a pizza stone, or two small baking sheets, on the bottom rack of your oven, leaving a 1-inch gap all around between the stone or sheets and the oven walls to allow heat to circulate. Preheat the oven to 450F (230C).
4. Gently punch down the dough. Divide the dough in half, and then set half aside, covered, while you work with the rest. Divide the other half into 8 equal pieces and flatten each piece with lightly floured hands. Roll out each piece to a circle 8 to 9 inches in diameter and less than 1/4 inch thick. Keep the rolled-out breads covered until ready to bake, but do not stack.
5. Place 2 breads, or more if your oven is large enough, on the stone or baking sheets, and bake for 2 to 3 minutes, or until each bread has gone into a full balloon. If for some reason your bread doesn't puff up, don't worry it should still taste delicious. Wrap the baked breads together in a large kitchen towel to keep them warm and soft while you bake the remaining rolled-out breads. Then repeat with the rest of the dough.

Hummus – Recipe adapted from The New Book of Middle Eastern Food by Claudia Roden
Prep Time: Hummus can be made in about 15 minutes once the beans are cooked. If you’re using dried beans you need to soak them overnight and then cook them the next day which takes about 90 minutes.

1.5 cups dried chickpeas, soaked in cold water overnight (or substitute well drained canned chickpeas and omit the cooking) (10 ounces/301 grams)
2-2.5 lemons, juiced (3 ounces/89ml)
2-3 garlic cloves, peeled and crushed
a big pinch of salt
4 tablespoons tahini (sesame paste) OR use peanut butter or any other nut butter—feel free to experiment) (1.5 ounces/45 grams)
additional flavorings (optional) I would use about 1/3 cup or a few ounces to start, and add more to taste

Directions:
1. Drain and boil the soaked chickpeas in fresh water for about 1 ½ hours, or until tender. Drain, but reserve the cooking liquid.
2. Puree the beans in a food processor (or you can use a potato masher) adding the cooking water as needed until you have a smooth paste.
3. Add the rest of the ingredients and mix well. Adjust the seasonings to taste.

The 2010 February Daring COOKs challenge was hosted by Michele of Veggie Num Nums. Michele chose to challenge everyone to make mezze based on various recipes from Claudia Roden, Jeffrey Alford and Naomi Dugid.

Stumble Upon Toolbar

Sunday, 7 February 2010

Jordan's Country crisp - muffins

This is a long over due blog post! Just before Christmas I was sent a couple of boxes of Jordan's country crisp to try.I'm a great believer in having a good breakfast to set you up for the day. For me this usually involves a bowl of porridge (all year round!). I'm a bit strange when it comes to cereal as I don't like milk! Weird I know but I never have (not even as a baby). This can cause problems at breakfast as I won't eat cereals where the milk is obvious. Porridge fits the bill perfectly plus it's healthy and I like to play around adding different toppings (mostly raisins or blueberries at the moment). I do sometimes wish that I liked milk so I could eat delicious looking granola, muesli and these country crisps.

Jordan's country crisp are delicious oat clusters, made from UK grown, conservation grade oats and no preservatives, artificial colours or salt is added. I tried the strawberry and the chocolate varieties and thought both were delicious added to a bowl of natural yogurt to add a bit of crunch and flavour. My boyfriend also tried both in the traditional way (with milk!) and loved both. Chocolate for breakfast though did seem like something that should be saved as a weekend treat!I also decided to try out one of the recipes supplied by Jordan's and finally settled on these delicious muffins. Probably not the healthiest recipe but delicious as an occasional treat. They were moist but with bits of texture from the country crisp and the nuts and also tasted of caramel due to the butter and brown sugar being melted together.

Country crisp muffins
(find this and other recipes on The Country Crisp Appreciation Society website)
Makes 6
Prep time: 10 mins, plus cooling
Cook time: 25-30 mins

120g unsalted butter
120g light brown soft sugar
2tbsp milk
75g self-raising flour
50g pecans, roughly chopped
50g sweetened dried cranberries
2 medium eggs, beaten
½ tsp vanilla extract (optional)
100g Jordans Dark Chocolate Country Crisp

1. Preheat oven to Gas Mark 4/180C/160C fan. Line a muffin tin with 6 muffin cases.
2. In a small pan, melt butter and sugar over a medium heat until the sugar is no longer grainy. Add the milk and leave to cool for 15 mins before whisking in the eggs and if using the vanilla, add it now.
3. Mix together the flour, pecans and cranberries in a large bowl, then pour in the cooled butter mixture. Beat until smooth before folding through the Jordans Dark Chocolate Country Crisp.
4. Using two dessertspoons, fill the muffin cases about ¾ full with the batter. Bake for 25-30 mins until the muffins are springy to the touch. Remove from the oven. Leave to cool for 10 mins in the tin, before transferring to a wire rack.

Stumble Upon Toolbar