Sunday 28 June 2009

Fresh from the oven - Rustic loaf

After I joined the Daring Kitchen I had a browse through their forums and discovered a post about a new bread baking group being set up by Brooke. I decided to join as I bake the majority of my own bread and I am keen to try new recipes and learn from others. I did wonder if joining 3 groups on the same days was a bit much but I'm going to do my best. This next month is a busy one for me with weddings and holidays so I may not participate in all 3 but plan to try to complete at least 2 but we'll see.

So we decided on a name for our bread baking group - Fresh from the oven - and then on the 1st of June our first challenge was announced.
This month's challenge is hosted by Brianna. She has chosen a Rustic Bread from Jeffrey Hamelman's Bread: A Baker's Book of Techniques and Recipes.


The recipe can be found here.

This is a good, basic recipe that introduces a simple preferment, minimalist ingredients, and lets us practice our shaping techniques.

I kept putting off baking this bread and only completed the challenge on Friday. I have baked breads before that involve a prefermenting stage (see here) and as before I found it hard to get organised in to making the initial preferment the night before I have time to make this bread. Even after this 16 hour rise time the recipe is not a quick one. After making the final dough you need to leave it to rise for 2 1/2 hours and then after shaping for about 1 1/2 hours. I also found the dough quiet wet and difficult to work with and the final loaf did not rise as much as I would have liked (it seemed to be spreading outwards but not upwards). The final bread thoug
h did taste delicious.

Stumble Upon Toolbar

Saturday 27 June 2009

Daring Bakers - Bakewell tart...er......pudding!

So I finally joined the Daring Bakers - I've admired their baking for sometime (long before I started my own blog). I never dreamed I would join as the challenges looked just that bit too challenging. Then I bought my KitchenAid and it opened up a whole array of baking pleasures that I never imagined baking. So I decided I would join in with all the fun the Daring Bakers were having. My first challenge was not only fun but very successful!

The June Daring Bakers' challenge was hosted by Jasmine of Confessions of a Cardamom Addict and Annemarie of Ambrosia and Nectar. They chose a Traditional (UK) Bakewell Tart... er... pudding that was inspired by a rich baking history dating back to the 1800's in England.

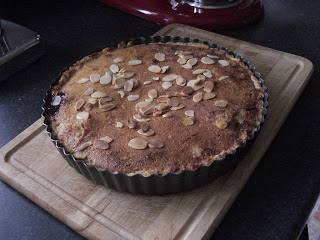
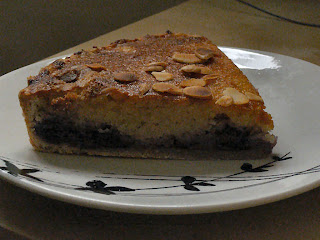
I live only an hour from Bakewell, Derbyshire, the home of the Bakewell tart so it seemed fitting my first challenge would be a traditional, local recipe. The weekend after the challenge was anounced my boyfriends parents were coming down to visit us for a meal so I decided that it would be a good idea to bake the tart for them. I was a little nervous I had bitten off more than I could chew (I'd never made pastry before) and that we'd be running round to the local supermarket at the last minute to buy a replacement dessert. I shouldn't have worried the tart was a massive success. It looked and tasted exactly as we all remember Bakewell tarts did on previous occasions when we have eaten them. I will definatley be saving this recipe and baking it again (my boyfriend has already started planning when I can bake it again!).

Preparations for the challenge involved a trip to Lakeland to buy a flan tin and resulted in the purchase of several non-essential baking items! In addition to the flan tin I bought a baguette pan, yeast, chopper/scrapper for bread making and a bit randomly a piping bag set (I've never decorated cakes before!).

The challenge

  • Bake a giant tart, medium tart or individual tartlettes.
  • Make the sweet shortcrust pastry from scratch, ideally by hand.
  • Make the frangipane layer.
  • Optional homemade jam or curd

Bakewell Tart…er…pudding

Makes one 23cm (9” tart)
Prep time: less than 10 minutes (plus time for the individual elements)
Resting time: 15 minutes
Baking time: 30 minutes
Equipment needed: 23cm (9”) tart pan or pie tin (preferably with ridged edges), rolling pin

One quantity sweet shortcrust pastry (recipe follows)
Bench flour
250ml (1cup (8 US fl. oz)) jam or curd, warmed for spreadability
One quantity frangipane (recipe follows)
One handful blanched, flaked almonds

Assembling the tart
Place the chilled dough disc on a lightly floured surface. If it's overly cold, you will need to let it become acclimatised for about 15 minutes before you roll it out. Flour the rolling pin and roll the pastry to 5mm (1/4”) thickness, by rolling in one direction only (start from the centre and roll away from you), and turning the disc a quarter turn after each roll. When the pastry is to the desired size and thickness, transfer it to the tart pan, press in and trim the excess dough. Patch any holes, fissures or tears with trimmed bits. Chill in the freezer for 15 minutes.

Preheat oven to 200C/400F.

Remove shell from freezer, spread as even a layer as you can of jam onto the pastry base.

Top with frangipane, spreading to cover the entire surface of the tart. Smooth the top and pop into the oven for 30 minutes. Five minutes before the tart is done, the top will be poofy and brownish. Remove from oven and strew flaked almonds on top and return to the heat for the last five minutes of baking.

The finished tart will have a golden crust and the frangipane will be tanned, poofy and a bit spongy-looking. Remove from the oven and cool on the counter. Serve warm, with crème fraîche, whipped cream or custard sauce if you wish.

When you slice into the tart, the almond paste will be firm, but slightly squidgy and the crust should be crisp but not tough.
Jasmine’s notes:
• If you cannot have nuts, you can try substituting Victoria sponge for the frangipane. It's a pretty popular popular cake, so you shouldn't have any troubles finding one in one of your cookbooks or through a Google search. That said, our dear Natalie at Gluten a Go Go has sourced some recipes and linked to them in the related alt.db thread.
• You can use whichever jam you wish, but if you choose something with a lot of seeds, such as raspberry or blackberry, you should sieve them out.
• The jam quantity can be anywhere from 60ml (1/4 cup) to 250ml (1cup), depending upon how “damp” and strongly flavoured your preserves are. I made it with the lesser quantity of home made strawberry jam, while Annemarie made it with the greater quantity of cherry jam; we both had fabulous results. If in doubt, just split the difference and spread 150ml (2/3cup) on the crust.
Annemarie’s notes:
• The excess shortcrust can be rolled out and cut into cookie-shapes (heck, it’s pretty darned close to a shortbread dough).

Sweet shortcrust pastry

Prep time: 15-20 minutes
Resting time: 30 minutes (minimum)
Equipment needed: bowls, box grater, cling film

225g (8oz) all purpose flour
30g (1oz) sugar
2.5ml (½ tsp) salt
110g (4oz) unsalted butter, cold (frozen is better)
2 (2) egg yolks
2.5ml (½ tsp) almond extract (optional)
15-30ml (1-2 Tbsp) cold water

Sift together flour, sugar and salt. Grate butter into the flour mixture, using the large hole-side of a box grater. Using your finger tips only, and working very quickly, rub the fat into the flour until the mixture resembles bread crumbs. Set aside.

Lightly beat the egg yolks with the almond extract (if using) and quickly mix into the flour mixture. Keep mixing while dribbling in the water, only adding enough to form a cohesive and slightly sticky dough.

Form the dough into a disc, wrap in cling and refrigerate for at least 30 minutes

Jasmine’s notes:
• I make this using vanilla salt and vanilla sugar.
• If you wish, you can substitute the seeds of one vanilla bean, one teaspoon of vanilla paste or one teaspoon of vanilla extract for the almond extract

Frangipane

Prep time: 10-15 minutes
Equipment needed: bowls, hand mixer, rubber spatula

125g (4.5oz) unsalted butter, softened
125g (4.5oz) icing sugar
3 (3) eggs
2.5ml (½ tsp) almond extract
125g (4.5oz) ground almonds
30g (1oz) all purpose flour

Cream butter and sugar together for about a minute or until the mixture is primrose in colour and very fluffy. Scrape down the side of the bowl and add the eggs, one at a time, beating well after each addition. The batter may appear to curdle. In the words of Douglas Adams: Don’t panic. Really. It’ll be fine. After all three are in, pour in the almond extract and mix for about another 30 seconds and scrape down the sides again. With the beaters on, spoon in the ground nuts and the flour. Mix well. The mixture will be soft, keep its slightly curdled look (mostly from the almonds) and retain its pallid yellow colour.

Annemarie’s notes:
• Add another five minutes or more if you're grinding your own almonds or if you're mixing by hand (Heaven help you).
Enjoy!

Stumble Upon Toolbar

Wednesday 24 June 2009

Cook book review - Tiffany Goodall Form pasta to pancakes The ultimate student cookbook.

This is a great introductory cookbook for students. It's the kind of book I would have like to have when I was at university. I left university only 4 years ago so remember my student days quiet well. I never had a student cookbook or any cookbook for that matter. Don't get me wrong, I didn't live on take aways and pot noodles! I think I ate quiet well for a student (I dread to think what my boyfriend lived off!) but I didn't cook anything which required a recipe either. My mum taught me the basics of how to cook meat and 2 veg before I left home. In addition to this I ate pasta with sauces from jars, frozen pizzas and the occasional ready meal (yes I'm a shamed to say I even ate the frozen Sunday roast ready meals!).

I received my review copy of this cookbook one morning last week and had a quick flick through the book before heading off to work. First impressions were good, lots of bright, colourful pictures and the food all looked delicious. I did initially think some of the recipes were very basic (boiled egg and soldiers, boiling pasta and baking jacket potatoes) but then I remembered my flatmate who set a jacket potato on fire in the microwave! or my boyfriend who admits that his parents tried to teach him to cook before going off to uni but he just wasn't interested in learning.

Since those initial first impressions I have had time to sit down and have a good read through the book and also my boyfriend tested a couple of recipes. This is a really good book for students or anyone moving out of home for the first time and having to learn to cook for themselves. As well as the real basics there is a good variety of recipes. From risottos to curries, smoothies to vodka watermellon and even a birthday cake. All meals are covered breakfasts, packed lunches, quick suppers, meals for friends and baking. There is even an introduction to basic kitchen equipment, store cupboard ingredients and basic hygiene. The format of the book is very unique with easy to follow comic strip style recipes with photos of every step of the process. Great for anyone completely new to the kitchen.

At the weekend my boyfriend tested out the chilli con carne recipe and followed the instructions in the book for cooking rice (something he had not cooked before). The chilli recipe serves 8 so is great for cooking for a group of friends or in our case freezing in to portions of 2 for when time is short. The result was delicious and his feed back was that the recipes were very clear and easy to understand.I would not hesitate to recommend this book to some one heading off to university this autumn. It's easy to follow, assumes no prior cooking skills (yet doesn't sound patronising or preachy) and is packed full of delicious recipes for every eventuality.

For more previews of the book see here.
Thanks to Quadrille Publishing for sending me my first review cookbook!

Stumble Upon Toolbar

Friday 19 June 2009

Hen party cupcakes!

I'm heading off this afternoon for a weekend of girly fun. One of my friends from college is getting married in a few weeks so a group of us have hired a cottage in the peak district for the weekend. Its hopefully going to be lots of catching up, relaxing and girly fun. We were all asked to take some food along and I decided to use it as an excuse to bake! So yesterday I made 24 cupcakes/fairy cakes and a seeded/wholemeal loaf of bread and this morning I decorated the cakes. I had a slight mishap with the pink food colouring and now have pink/red fingers which I'm hoping will fade fast! I'll let you know next week how the buns tasted/went down with the other hens! I'm a little disappointed with them, the cakes didn't rise all that much and I found icing them harder than I imagined but I definitely noticed an improvement as I went along (the bright pink ones were the last ones I iced as I ran out of icing with only a few buns left). I half wish I'd made brownies which I have baked before and were delicious but I wanted to make something suitably girly!

Stumble Upon Toolbar

Wednesday 17 June 2009

Roast chicken

A few weeks back Able and Cole sent me one of their free range, organic chickens to try for free in exchange for a review on my blog. For anyone that doesn't know Able and Cole are an organic food deli every company. They are best known for their veg boxes that are delivered to your door each week. They also offer a wide range of other organic food that can also be delivered to you. I was initially concerned about having fresh food delivered (that needs refrigeration) in case no one was in when it was delivered. Veg boxes may be fine left outside for several hours but this is not appropriate for fresh chickens. I needn't of worried though, not only was the delivery before 8am (meaning the chicken was in the fridge before work) but it was delivered in a polystyrene box with plenty of ice packs on top of it to keep it cool. The chicken also comes with the giblets which doesn't often happen in the supermarket. Mine are sat in the freezer waiting for me to find time to make stock.


I thought about cooking it in a different way to the normal simple roast I usually do but then decided it would be best to keep it simple and see if I could taste the difference. I usually buy a supermarket free range chicken (not usually organic though) which costs around £4 per kg. Able and Cole's comes in at £6.76 per kg. I served the chicken with some baby new potatoes and asparagus.


So the big question could we notice the difference? Yes, we both thought the chicken had a stronger taste.

Will I be switching to organic chickens? not at the moment. The cost is the big issue for me. I strongly believe in only buying free range chickens but at the moment my budget won't stretch to organic as well.

Next month I will be reviewing a selection of items from their new summer range. Suggestions on ideas for using taleggio cheese appreciated! (Its not a cheese I know anything about)

Stumble Upon Toolbar

Monday 15 June 2009

Chinese meatball and noodle soup

Whilst shopping for ingredients for my Chinese dumplings I came across some reduced priced pak choi. It still looked healthy and knowing I would have left over ingredients from the dumplings I decided to make a meatball/noodle soup the day after. The soup included the meatballs, pak choi, left over shitake mushrooms and spring onions and noodles. The mince for the chinese dumplings was packed with flavour so I kept the soup fairly simple. On the day I made the dumplings I rolled tablespoons of the leftover mince in to balls and baked in the oven for around 15 minutes. I then stored them in the fridge overnight. The following day the soup was quiet simple to pull together. I stir fried the meatballs with the vegetables to reheat them. The end result was delicious and packed with oriental flavours.
Chinese meatball and noodle soup
Serves 2

For the meatballs
(I used approximately half of the mince in this recipe. Below I have detailed an estimate of what I believe would produce something similar if you don't have left over mince from making gyoza)

200g ground pork
2 large spring greens leaves, minced
1 stalk spring onion, minced
3 shitake mushrooms, minced (if dried - rehydrated and rinsed carefully)
2.5cm ginger root, minced
1.5 tbsp soy sauce
1 tbsp sesame oil
1 tbsp corn starch

  • Pre-heat the oven to 200C.
  • Combine all the filling ingredients well.
  • Roll tablespoons of the mixture into balls.
  • Arrange on a baking tray.
  • Bake in the oven for 15-20 minutes or until golden and cooked through.

For the noodle soup
800ml Chicken or vegetable stock
1 tbsp root ginger, finely grated
1 red chilli, finely chopped (I used a dried chilli as that was all I had).
1 clove of garlic, finely chopped
2 pak choi, sliced
6 shitake mushrooms, sliced
2 spring onions, finely sliced
2 portions of vermicelli noodles, cooked according to the packet
2 tbsp soy sauce

  • In a saucepan bring to the boil the stock, ginger, garlic and chilli. Simmer for at least 5 minutes or until you are ready to serve the finished soup.
  • In a frying pan (or wok if you have one), heat 1 tbsp vegetable or sunflower oil until hot.
  • Stir fry the pak choi stalks, spring onion and shitake mushrooms.
  • Add the pak choi leaves when the rest of the vegetables are almost cooked (approx 3-5 minutes depending on how well cooked you like your veg).
  • Add the soy sauce to the stock.
  • Combine the noodles, vegetables, meatballs and stock. Serve.

Enjoy!

Stumble Upon Toolbar

Sunday 14 June 2009

Summer days - Ice cream floats

Who decided 3 ice lollies is a good number for a multi-pack?

Instead of fighting over the last one my boyfriend decided to chop it in half and adding each half to a glass of lemonade. He called the result a pimped up ice cream float and it truly was delicious!
Enjoy!

Stumble Upon Toolbar

Daring cooks challenge - Chinese dumplings/potstickes

Like many of you I have enjoyed reading about Daring bakers and their monthly baking challenges for a while now. When I heard about the Daring cooks starting I thought about joining as I cook more than I bake but was a little nervous that I was too fussy an eater! Then for their first challenge they made ricotta gnocchi and I kicked myself for not joining! I have wanted to make gnocchi for some time now but never quiet got round to it. So the day of the big reveal of all these delicious gnocchi dishes I decided to become a daring cook myself. Having just purchased my KitchenAid I decided to join the Daring bakers too!

This months challenge is hosted by Jen of use real butter and the challenge is Chinese dumplings/potstickes (aka gyoza in Japanese). I have to admit to being a little daunted by my first challenge. It was completely out of my comfort zone of British or Italian meals and to top it off they look like they involve lots of complicated, intricate steps. But then if it was simple, it wouldn't be a challenge! I read the recipe through and looked at all the pictures and actually started to get a little bit excited. My boyfriend (who loves oriental food and will be forever grateful for the daring cooks for this challenge) was more than happy to be chief tester.
The main point of the challenge was to make our own wrappers (not to buy pre-made wanton wrappers) and learn to pleat them. I didn't have too much trouble making the dough but the same can not be said for pleating them! Example below!


The results: You'll see from my pictures (especially if you see all the other daring cooks entries) that mine did not turn out very professional looking but its the taste that counts and even I loved them!

Will I make them again? I'm not sure. They were pretty time consuming which was fun for a challenge but not something I can see see myself making regularly.

For a great step by step recipe/how to check out Jen's version.

Below is the full recipe (warning its long!) and right at the end I write about my method and choice of filling etc.

Chinese Dumplings/Potstickers

pork filling:
1 lb (450g) ground pork
4 large napa cabbage leaves, minced
3 stalks green onions, minced
7 shitake mushrooms, minced (if dried - rehydrated and rinsed carefully)
1/2 cup (75g) bamboo shoots, minced
1/4 (55g) cup ginger root, minced
3 tbsp (40g) soy sauce
2 tbsp (28g) sesame oil
2 tbsp (16g) corn starch

OR

shrimp filling:
1/2 lb (225g) raw shrimp, peeled, deveined, and coarsely chopped
1/2 lb (225g) ground pork
3 stalks green onions, minced
1/4 cup (55g) ginger root, minced
1 cup (142g) water chestnuts, minced
1 tsp (5g) salt
3 tbsp (40g) sesame oil
2 tbsp (16g) corn starch

dough: (double this for the amount of filling, but easier to make it in 2 batches - or just halve the filling recipe)
2 cups (250g) all-purpose flour
1/2 cup (113g) warm water
flour for work surface

dipping sauce:
2 parts soy sauce
1 part vinegar (red wine or black)
a few drops of sesame oil
chili garlic paste (optional)
minced ginger (optional)
minced garlic (optional)
minced green onion (optional)
sugar (optional)

Combine all filling ingredients in a large mixing bowl and mix thoroughly (I mix by clean hand). Cover and refrigerate until ready to use (up to a day, but preferably within an hour or two).

Make the dough, Method 1: Place the flour in the work bowl of a food processor with the dough blade. Run the processor and pour the warm water in until incorporated. Pour the contents into a sturdy bowl or onto a work surface and knead until uniform and smooth. The dough should be firm and silky to the touch and not sticky.[Note: it’s better to have a moist dough and have to incorporate more flour than to have a dry and pilling dough and have to incorporate more water).

Make the dough, Method 2: In a large bowl mix flour with 1/4 cup of water and stir until water is absorbed. Continue adding water one teaspoon at a time and mixing thoroughly until dough pulls away from sides of bowl. We want a firm dough that is barely sticky to the touch.

Both dough methods: Knead the dough about twenty strokes then cover with a damp towel for 15 minutes. Take the dough and form a flattened dome. Cut into strips about 1 1/2 to 2 inches wide. Shape the strips into rounded long cylinders. On a floured surface, cut the strips into 3/4 inch pieces. Press palm down on each piece to form a flat circle (you can shape the corners in with your fingers). With a rolling pin, roll out a circular wrapper from each flat disc. Take care not to roll out too thin or the dumplings will break during cooking - about 1/16th inch. Leave the centers slightly thicker than the edges. Place a tablespoon of filling in the center of each wrapper and fold the dough in half, pleating the edges along one side. Keep all unused dough under damp cloth.

To boil: Bring a large pot of water to a boil and add dumplings to pot. Boil the dumplings until they float.

To steam: Place dumplings on a single layer of napa cabbage leaves or on a well-greased surface in a steamer basket with lid. Steam covered for about 6 minutes.

To pan fry (potstickers): Place dumplings in a frying pan with 2-3 tbsp of vegetable oil. Heat on high and fry for a few minutes until bottoms are golden. Add 1/2 cup water and cover. Cook until the water has boiled away and then uncover and reduce heat to medium or medium low. Let the dumplings cook for another 2 minutes then remove from heat and serve.

To freeze: Assemble dumplings on a baking sheet so they are not touching. It helps to rub the base of the dumpling in a little flour before setting on the baking sheet for ease of release. Freeze for 20-30 minutes until dumplings are no longer soft. Place in ziplock bag and freeze for up to a couple of months. Prepare per the above instructions, but allow extra time to ensure the filling is thoroughly cooked.

To serve: Serve dumplings or potstickers hot with your choice of dipping sauce combinations.

My method
I chose the pork filling and I replaced the napa cabbage leaves with some spring greens I had in the fridge. I omitted the bamboo shoots and used fresh shitake mushrooms. I used 250g plain flour and mixed the dough in a food processor with no problems. I chose the potstickers method of cooking (as I was afraid my dumplings wouldn't hold up to boiling! and I don't own a steamer). I made a simple dipping sauce of equal amounts of light soy sauce and sweet chilli dipping sauce. Only about half the filling was used for the dumplings so the rest I made in to meatballs and used in a noodle soup which I will post in a few days.

Thanks Jen for a great challenge! I recommend that you check out some of the other Daring Cooks blog posts as I have been watching them on the DC forum all month and there are some great looking variations including sweet ones!

Stumble Upon Toolbar

Tuesday 9 June 2009

Chicken and pesto pizza

I've been meaning to make a roast chicken (leftovers from Sunday lunch) and pesto pizza for some time and tonight I finally got round to it. It was definitely worth the wait! Sorry about the poor picture of one lonely slice but in our eagerness to try it I forgot to take any pictures until it was nearly too late! Pesto makes a delicious pizza sauce and a nice change from the classic tomato sauce.

Chicken and pesto pizza

For the dough

makes 3 pizza's or 1 pizza and a focaccia to go with it

325ml warm water
5g dried yeast
1 tbsp olive oil (I usually use extra virgin for breads/pizzas)
500g strong white bread flour
1-2 tsp salt

For the topping
Pesto
shredded leftover roast chicken
ball of mozzarella cheese

  1. Place all the dry ingredients in a food mixer (if using) and fit the dough hook to the mixer head.
  2. Put the mixer on low speed (2 for KitchenAids - consult the manual for other mixers) and slowly add the liquid ingredients to the bowl.
  3. Once all the ingredients are combined leave to knead for 3-5 minutes or until the dough is smooth and springs back when prodded.
  4. If you don't have a mixer place all the dry ingredients in a large bowl and make a well in the centre. Add the liquid to the well and use a wood spoon to mix until it is too difficult and then use your hands. Knead the dough on a lightly floured surface until smooth and springy.
  5. Leave to rise until doubled in size (around 1 to 1.5hrs).
  6. Preheat the oven to 250C or as hot as the oven gets.
  7. Gently knock the air out of the dough.
  8. Remove a third of the dough and on a lightly floured surface roll out the dough into the desired shape size.
  9. Spread a layer of pesto over the dough, leaving a 2cm boarder around the edge.
  10. Scatter over the shredded chicken pieces.
  11. Top with mozzarella cheese.
  12. Bake in a hot oven for around 1o minutes or until the crust is golden.
Enjoy!

Stumble Upon Toolbar

Monday 1 June 2009

June - Whats in season?

The weather it the UK is glorious sunshine at the moment and it really feels like the start of summer. We've eaten most of our meals outside for the last few days as well which is a very plesant change. The variety of fresh fruit and vegetables in season now in the UK is rapidly increasing. The pictures are of the few vegetables and herbs I've chosen to grow in my small back garden. These were taken a week ago and alread the mangtout are twice as tall!

Sources used to put this list together:

Sainsbury's Magazine May (& there 2009 recipe calendar).
Eat the seasons
What's in season?
River cottage seasonal guide - The Guardian

June

Vegetables: Asparagus, Aubergines, Beetroot, broad beans, Broccoli, Cauliflower, Carrots, Courgettes, Cucumbers, Fennel, Globe artichokes, Green beans, Jersey Royals, Kohlarabi, Lettuce, Mangtout, Mint, Parsley, Peas, Pea shoots, Peppers, Radishes, Runner beans, Rocket, Salad leaves, Samphire, Tomatoes, Watercress,

Fruit: Cherries, Elderflowers, Gooseberries, Passion fruit, Raspberries, Redcurrents, Rhubarb, Strawberries, Tayberries.

Seafood: Crab, Cuttlefish, Dover sole, Grey mullet, Hake, Lemon sole, Lobster, Mackerel, Monkfish, Plaice, Pollack, Prawns, Salmon, Sea bream, Whitebait

Meat: Duck, Welsh Lamb

Stumble Upon Toolbar